## About The Pull Request Relies on #72886 for some render relay expansion I use for light_mask stuff. Hello bestie! Night vision pissed me off, so I've come to burn this place to the ground. Two sections to discuss here. First we'll talk about see_in_dark and why I hate it, second we'll discuss the lighting plane and how we brighten it, plus introducing color to the party. ### `see_in_dark` and why it kinda sucks https://www.byond.com/docs/ref/#/mob/var/see_in_dark See in dark lets us control how far away from us a turf can be before we hide it/its contents if it's dark (not got luminosity set) We currently set it semi inconsistently to provide nightvision to mobs. The trouble is stuff that produces light != stuff that sets luminosity. The worst case of this can be seen by walking out of escape on icebox, where you'll see this  Snow draws above the lighting plane, so the snow will intermittently draw, depending on see_in_dark and the luminosity from tracking lights. This would in theory be solvable by modifying the area, but the same problem applies across many things in the codebase. As things currently stand, to be emissive you NEED to have a light on your tile. People are bad at this, and honestly it's a bit much to expect of them. An emissive overlay on a canister shouldn't need an element or something and a list on turfs to manage it. This gets worse when you factor in the patterns I'm using to avoid drawing lights above nothing, which leads to lights that should show, but are misoffset because their parent pixel offsets. It's silly. We do it so we can have things like mesons without just handing out night vision, but even there the effect of just hiding objects and mobs looks baddddddd when moving. It's always bothered me. I'll complain about mesons more later, but really just like, they're too bright as it is. I'm proposing here that rather then manually hiding stuff based off distance from the player, we can instead show/hide using just the lighting plane. This means things like mesons are gonna get dimmer, but that's fine because they suck. It does have some side effects, things like view() on mobs won't hide stuff in darkness, but that's fine because none actually thinks about view like that, I think. Oh and I added a case to prevent examining stuff that's in darkness, and not right next to you when you don't have enough nightvision, to match the old behavior `see_in_dark` gave us. Now I'd like to go on a mild tangent about color, please bare with me ### Color and why `lighting_alpha` REALLY sucks You ever walk around with mesons on when there's a fire going, or an ethereal or firelocks down. You notice how there isn't really much color to our lights? Doesn't that suck? It's because the way we go about brighting lighting is by making everything on the lighting plane transparent. This is fine for brightening things, but it ends up looking kinda crummy in the end and leads to really washed out colors that should be bright. Playing engineer or miner gets fucking depressing. The central idea of this pr, that everything else falls out of, is instead of making the plane more transparent, we can use color matrixes to make things AT LEAST x bright. https://www.byond.com/docs/ref/#/{notes}/color-matrix Brief recap for color matrixes, fully expanded they're a set of 20 different values in a list Units generally scale 0-1 as multipliers, though since it's multiplication in order to make an rgb(1,1,1) pixel fullbright you would need to use 255s. A "unit matrix" for color looks like this: ``` list(1, 0, 0, 0, 0, 1, 0, 0, 0, 0, 1, 0, 0, 0, 0, 1, 0, 0, 0, 0 ) ``` The first four rows are how much each r, g, b and a impact r, g, b and well a. So a first row of `(1, 0, 0, 0)` means 1 unit of r results in 1 unit of r. and 0 units of green, blue and alpha, and so on. A first row of `(0, 1, 0, 0)` would make 1 red component into 1 green component, and leave red, blue and alpha alone, shifting any red of whatever it's applied to a green. Using these we can essentially color transform our world. It's a fun tool. But there's more. That last row there doesn't take a variable input like the others. Instead, it ADDS some fraction of 255 to red, green, blue and alpha. So a fifth row of `(1, 0, 0, 0)` would make every pixel as red as it could possibly be. This is what we're going to exploit here. You see all these values accept negative multipliers, so we can lower colors down instead of raising them up! The key idea is using color matrix filters https://www.byond.com/docs/ref/#/{notes}/filters/color to chain these operations together. Pulling alllll the way back, we want to brighten darkness without affecting brighter colors. Lower rgb values are darker, higher ones are brighter. This relationship isn't really linear because of suffering reasons, but it's good enough for this. Let's try chaining some matrixes on the lighting plane, which is bright where fullbright, and dark where dark. Take a list like this ``` list(1, 0, 0, 0, 0, 1, 0, 0, 0, 0, 1, 0, 0, 0, 0, 1, -0.2, -0.2, -0.2, 0 ) ``` That would darken the lighting a bit, but negative values will get rounded to 0 A subsequent raising by the same amount ``` list(1, 0, 0, 0, 0, 1, 0, 0, 0, 0, 1, 0, 0, 0, 0, 1, 0.2, 0.2, 0.2, 0 ) ``` Will essentially threshold our brightness at that value. This ensures we aren't washing out colors when we make things brighter, while leaving higher values unaffected since they basically just had a constant subtracted and then readded. ### But wait, there's more You may have noticed, we gain access to individual color components here. This means not only can we darken and lighten by thresholds, we can COLOR those thresholds. ``` list(1, 0, 0, 0, 0, 1, 0, 0, 0, 0, 1, 0, 0, 0, 0, 1, 0.1, 0.2, 0.1, 0 ) ``` Something like the above, if applied with its inverse, would tint the darkness green. The delta between the different scalars will determine how vivid the color is, and the actual value will impact the brightness. Something that's always bothered me about nightvision is it's just greyscale for the most part, there isn't any color to it. There was an old idea of coloring the game plane to match their lenses, but if you've ever played with the colorblind quirk you know that gets headachey really fast. So instead of that, lets color just the darkness that these glasses produce. It provides some reminder that you're wearing them, instead of just being something you forget about while playing, and provides a reason to use flashlights and such since they can give you a clearer, less tinted view of things while retaining the ability to look around things. I've so far applied this pattern to JUST headwear for humans (also those mining wisps) I'm planning on furthering it to mobs that use nightvision, but I wanted to get this up cause I don't wanna pr it the day before the freeze. Mesons are green, sec night vision is red, thermals orange, etc. I think the effect this gives is really really nice. I've tuned most things to work for the station, though mesons works for lavaland for obvious reasons. I've tuned things significantly darker then we have them set currently, since I really hate flat lighting and this system suffers when interacting with it. My goal with these is to give you a rough idea of what's around you, without a good eye for detail. That's the difference between say, mesons, and night vision. One helps you see outlines, the other gives you detail and prevents missing someone in the darkness. It's hard to balance this precisely because of different colored backgrounds (looking at you icebox) More can be done on this front in future but I'm quite happy with things as of now ### **EDIT** I have since expanded to all uses of nightvision, coloring most all of them. Along the way I turned some toggleable nightvision into just one level. Fullbright sucks, and I'd rather just have one "good" value. I've kept it for a few cases, mostly eyes you rip out of mobs. Impacted mobs are nightmares, aliens, zombies, revenants, states and sort of stands. I've done a pass on all mobs and items that impact nightvision and added what I thought was the right level of color to them. This includes stuff like blobs and shuttle control consoles As with glasses much of this was around reducing vision, though I kept it stronger here, since many of these mobs rely on it for engaging with the game <details> <summary> Technical Changes </summary> #### Adds filter proc (the ones that act like templates) support to filter transitions. Found this when testing this pr, seemed silly. #### Makes our emissive mask mask all light instead This avoids dumbass overlay lighting lighting up wallmounts. We switch modes if some turfflags are set, to accomplish the same thing with more overhead, and support showing things through the darkness. Also fixes a bug where you'd only get one fullscreen object per mob, so opening and closing a submap would take it away Also also fixes the lighting backdrop not actually spanning the screen. It doesn't actually do anything anymore because of the fullscreen light we have, but just in case that's unsued. Needs cleanup in future. #### Moves openspace to its own plane that doesn't draw, maxing its color with a sprite This is to support the above We relay this plane to lighting mask so openspace can like, have lighting #### Changes our definition of nightvision to the light cutoff of night vision goggles and such Side affect of removing see_in_dark. This logic is a bit weak atm, needs some work. #### Removes the nightvision spell It's a dupe of the nightvision action button, and newly redundant since I've removed all uses of it #### Cleans up existing plane master critical defines, ensures trasnparent won't render These sucked Also transparent stuff should never render, if it does you'll get white blobs which suck </details> ## Why It's Good For The Game Videos! (Github doesn't like using a summary here I'm sorry) <details> Demonstration of ghost lighting, and color https://user-images.githubusercontent.com/58055496/215693983-99e00f9e-7214-4cf4-a76a-6e669a8a1103.mp4 Engi-glass mesons and walking in maint (Potentially overtuned, yellow is hard) https://user-images.githubusercontent.com/58055496/215695978-26e7dc45-28aa-4285-ae95-62ea3d79860f.mp4 Diagnostic nightvision goggles and see_in_dark not hiding emissives https://user-images.githubusercontent.com/58055496/215692233-115b4094-1099-4393-9e94-db2088d834f3.mp4 Sec nightvision (I just think it looks neat) https://user-images.githubusercontent.com/58055496/215692269-bc08335e-0223-49c3-9faf-d2d7b22fe2d2.mp4 Medical nightvision goggles and other colors https://user-images.githubusercontent.com/58055496/215692286-0ba3de6a-b1d5-4aed-a6eb-c32794ea45da.mp4 Miner mesons and mobs hiding in lavaland (This is basically the darkest possible environment) https://user-images.githubusercontent.com/58055496/215696327-26958b69-0e1c-4412-9298-4e9e68b3df68.mp4 Thermal goggles and coloring displayed mobs https://user-images.githubusercontent.com/58055496/215692710-d2b101f3-7922-498c-918c-9b528d181430.mp4 </details> I think it's pretty, and see_in_dark sucks butt. ## Changelog <!-- If your PR modifies aspects of the game that can be concretely observed by players or admins you should add a changelog. If your change does NOT meet this description, remove this section. Be sure to properly mark your PRs to prevent unnecessary GBP loss. You can read up on GBP and it's effects on PRs in the tgstation guides for contributors. Please note that maintainers freely reserve the right to remove and add tags should they deem it appropriate. You can attempt to finagle the system all you want, but it's best to shoot for clear communication right off the bat. --> 🆑 add: The darkness that glasses and hud goggles that impact your nightvision (think mesons, nightvision goggles, etc) lighten is now tinted to match the glasses. S pretty IMO, and hopefully it helps with forgetting you're wearing X. balance: Nightvision is darker. I think bright looks bad, and things like mesons do way too much balance: Mesons (and mobs in general) no longer have a static distance you can see stuff in the dark. If a tile is lit, you can now see it. fix: Nightvision no longer dims colored lights, instead simply thresholding off bits of darkness that are dimmer then some level. /🆑
Preferences (by Mothblocks)
This does not contain all the information on specific values--you can find those as doc-comments in relevant paths, such as /datum/preference. Rather, this gives you an overview for creating most preferences, and getting your foot in the door to create more advanced ones.
Anatomy of a preference (A.K.A. how do I make one?)
Most preferences consist of two parts:
- A
/datum/preferencetype. - A tgui representation in a TypeScript file.
Every /datum/preference requires these three values be set:
category- See Categories.savefile_key- The value which will be saved in the savefile. This will also be the identifier for tgui.savefile_identifier- Whether or not this is a character specific preference (PREFERENCE_CHARACTER) or one that affects the player (PREFERENCE_PLAYER). As an example: hair color isPREFERENCE_CHARACTERwhile your UI settings arePREFERENCE_PLAYER, since they do not change between characters.
For the tgui representation, most preferences will create a .tsx file in tgui/packages/tgui/interfaces/PreferencesMenu/preferences/features/. If your preference is a character preference, make a new file in character_preferences. Otherwise, put it in game_preferences. The filename does not matter, and this file can hold multiple relevant preferences if you would like.
From here, you will want to write code resembling:
import { Feature } from "../base";

export const savefile_key_here: Feature<T> = {
  name: "Preference Name Here",
  component: Component,

  // Necessary for game preferences, unused for others
  category: "CATEGORY",

  // Optional, only shown in game preferences
  description: "This preference will blow your mind!",
}
T and Component depend on the type of preference you're making. Here are all common examples...
Numeric preferences
Examples include age and FPS.
A numeric preference derives from /datum/preference/numeric.
/datum/preference/numeric/legs
	category = PREFERENCE_CATEGORY_NON_CONTEXTUAL
	savefile_identifier = PREFERENCE_CHARACTER
	savefile_key = "legs"

	minimum = 1
	maximum = 8
You can optionally provide a step field. This value is 1 by default, meaning only integers are accepted.
Your .tsx file would look like:
import { Feature, FeatureNumberInput } from "../base";

export const legs: Feature<number> = {
  name: "Legs",
  component: FeatureNumberInput,
}
Toggle preferences
Examples include enabling tooltips.
/datum/preference/toggle/enable_breathing
	category = PREFERENCE_CATEGORY_NON_CONTEXTUAL
	savefile_identifier = PREFERENCE_CHARACTER
	savefile_key = "enable_breathing"

	// Optional, TRUE by default
	default_value = FALSE
Your .tsx file would look like:
import { CheckboxInput, FeatureToggle } from "../base";

export const enable_breathing: FeatureToggle = {
  name: "Enable breathing",
  component: CheckboxInput,
}
Choiced preferences
A choiced preference is one where the only options are in a distinct few amount of choices. Examples include skin tone, shirt, and UI style.
To create one, derive from /datum/preference/choiced.
/datum/preference/choiced/favorite_drink
	category = PREFERENCE_CATEGORY_NON_CONTEXTUAL
	savefile_identifier = PREFERENCE_CHARACTER
	savefile_key = "favorite_drink"
Now we need to tell the game what the choices are. We do this by overriding init_possible_values(). This will return a list of possible options.
/datum/preference/choiced/favorite_drink/init_possible_values()
	return list(
		"Milk",
		"Cola",
		"Water",
	)
Your .tsx file would then look like:
import { FeatureChoiced, FeatureDropdownInput } from "../base";

export const favorite_drink: FeatureChoiced = {
  name: "Favorite drink",
  component: FeatureDropdownInput,
};
This will create a dropdown input for your preference.
Choiced preferences - Icons
Choiced preferences can generate icons. This is how the clothing/species preferences work, for instance. However, if we just want a basic dropdown input with icons, it would look like this:
/datum/preference/choiced/favorite_drink
	category = PREFERENCE_CATEGORY_NON_CONTEXTUAL
	savefile_identifier = PREFERENCE_CHARACTER
	savefile_key = "favorite_drink"
	should_generate_icons = TRUE // NEW! This is necessary.

// Instead of returning a flat list, this now returns an assoc list
// of values to icons.
/datum/preference/choiced/favorite_drink/init_possible_values()
	return list(
		"Milk" = icon('drinks.dmi', "milk"),
		"Cola" = icon('drinks.dmi', "cola"),
		"Water" = icon('drinks.dmi', "water"),
	)
Then, change your .tsx file to look like:
import { FeatureChoiced, FeatureIconnedDropdownInput } from "../base";

export const favorite_drink: FeatureChoiced = {
  name: "Favorite drink",
  component: FeatureIconnedDropdownInput,
};
Choiced preferences - Display names
Sometimes the values you want to save in code aren't the same as the ones you want to display. You can specify display names to change this.
The only thing you will add is "compiled data".
/datum/preference/choiced/favorite_drink/compile_constant_data()
	var/list/data = ..()

	// An assoc list of values to display names
	data[CHOICED_PREFERENCE_DISPLAY_NAMES] = list(
		"Milk" = "Delicious Milk",
		"Cola" = "Crisp Cola",
		"Water" = "Plain Ol' Water",
	)

	return data
Your .tsx file does not change. The UI will figure it out for you!
Color preferences
These refer to colors, such as your OOC color. When read, these values will be given as 6 hex digits, without the pound sign.
/datum/preference/color/eyeliner_color
	category = PREFERENCE_CATEGORY_NON_CONTEXTUAL
	savefile_identifier = PREFERENCE_CHARACTER
	savefile_key = "eyeliner_color"
Your .tsx file would look like:
import { FeatureColorInput, Feature } from "../base";

export const eyeliner_color: Feature<string> = {
  name: "Eyeliner color",
  component: FeatureColorInput,
};
Name preferences
These refer to an alternative name. Examples include AI names and backup human names.
These exist in code/modules/client/preferences/names.dm.
These do not need a .ts file, and will be created in the UI automatically.
/datum/preference/name/doctor
	savefile_key = "doctor_name"

	// The name on the UI
	explanation = "Doctor name"

	// This groups together with anything else with the same group
	group = "medicine"

	// Optional, if specified the UI will show this name actively
	// when the player is a medical doctor.
	relevant_job = /datum/job/medical_doctor
Making your preference do stuff
There are a handful of procs preferences can use to act on their own:
/// Apply this preference onto the given client.
/// Called when the savefile_identifier == PREFERENCE_PLAYER.
/datum/preference/proc/apply_to_client(client/client, value)

/// Fired when the preference is updated.
/// Calls apply_to_client by default, but can be overridden.
/datum/preference/proc/apply_to_client_updated(client/client, value)

/// Apply this preference onto the given human.
/// Must be overriden by subtypes.
/// Called when the savefile_identifier == PREFERENCE_CHARACTER.
/datum/preference/proc/apply_to_human(mob/living/carbon/human/target, value)
For example, /datum/preference/numeric/age contains:
/datum/preference/numeric/age/apply_to_human(mob/living/carbon/human/target, value)
	target.age = value
If your preference is PREFERENCE_CHARACTER, it MUST override apply_to_human, even if just to immediately return.
You can also read preferences directly with prefs.read_preference(/datum/preference/type/here), which will return the stored value.
Categories
Every preference needs to be in a category. These can be found in code/__DEFINES/preferences.dm.
/// These will be shown in the character sidebar, but at the bottom.
#define PREFERENCE_CATEGORY_FEATURES "features"

/// Any preferences that will show to the sides of the character in the setup menu.
#define PREFERENCE_CATEGORY_CLOTHING "clothing"

/// Preferences that will be put into the 3rd list, and are not contextual.
#define PREFERENCE_CATEGORY_NON_CONTEXTUAL "non_contextual"

/// Will be put under the game preferences window.
#define PREFERENCE_CATEGORY_GAME_PREFERENCES "game_preferences"

/// These will show in the list to the right of the character preview.
#define PREFERENCE_CATEGORY_SECONDARY_FEATURES "secondary_features"

/// These are preferences that are supplementary for main features,
/// such as hair color being affixed to hair.
#define PREFERENCE_CATEGORY_SUPPLEMENTAL_FEATURES "supplemental_features"
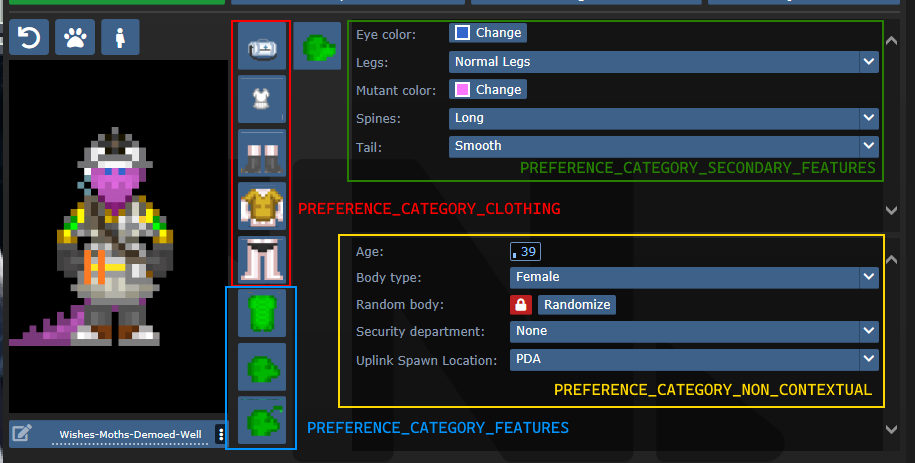
SECONDARY_FEATURES or NON_CONTEXTUAL?
Secondary features tend to be species specific. Non contextual features shouldn't change much from character to character.
Default values and randomization
There are three procs to be aware of in regards to this topic:
create_default_value(). This is used when a value deserializes improperly or when a new character is created.create_informed_default_value(datum/preferences/preferences)- Used for more complicated default values, like how names require the gender. Will callcreate_default_value()by default.create_random_value(datum/preferences/preferences)- Explicitly used for random values, such as when a character is being randomized.
create_default_value() in most preferences will create a random value. If this is a problem (like how default characters should always be human), you can override create_default_value(). By default (without overriding create_random_value), random values are just default values.
Advanced - Server data
As previewed in the display names implementation, there exists a compile_constant_data() proc you can override.
Compiled data is used wherever the server needs to give the client some value it can't figure out on its own. Skin tones use this to tell the client what colors they represent, for example.
Compiled data is sent to the serverData field in the FeatureValueProps.
Advanced - Creating your own tgui component
If you have good knowledge with tgui (especially TypeScript), you'll be able to create your own component to represent preferences.
The component field in a feature accepts any component that accepts FeatureValueProps<TReceiving, TSending = TReceiving, TServerData = undefined>.
This will give you the fields:
act: typeof sendAct,
featureId: string,
handleSetValue: (newValue: TSending) => void,
serverData: TServerData | undefined,
shrink?: boolean,
value: TReceiving,
act is the same as the one you get from useBackend.
featureId is the savefile_key of the feature.
handleSetValue is a function that, when called, will tell the server the new value, as well as changing the value immediately locally.
serverData is the server data, if it has been fetched yet (and exists).
shrink is whether or not the UI should appear smaller. This is only used for supplementary features.
value is the current value, could be predicted (meaning that the value was changed locally, but has not yet reached the server).
For a basic example of how this can look, observe CheckboxInput:
export const CheckboxInput = (
  props: FeatureValueProps<BooleanLike, boolean>
) => {
  return (<Button.Checkbox
    checked={!!props.value}
    onClick={() => {
      props.handleSetValue(!props.value);
    }}
  />);
};
Advanced - Middleware
A /datum/preference_middleware is a way to inject your own data at specific points, as well as hijack actions.
Middleware can hijack actions by specifying action_delegations:
/datum/preference_middleware/congratulations
	action_delegations = list(
		"congratulate_me" = PROC_REF(congratulate_me),
	)

/datum/preference_middleware/congratulations/proc/congratulate_me(list/params, mob/user)
	to_chat(user, span_notice("Wow, you did a great job learning about middleware!"))

	return TRUE
Middleware can inject its own data at several points, such as providing new UI assets, compiled data (used by middleware such as quirks to tell the client what quirks exist), etc. Look at code/modules/client/preferences/middleware/_middleware.dm for full information.
Antagonists
In order to make an antagonist selectable, you must do a few things:
- Your antagonist needs an icon.
- Your antagonist must be in a Dynamic ruleset. The ruleset must specify the antagonist as its
antag_flag. - Your antagonist needs a file in
tgui/packages/tgui/interfaces/PreferencesMenu/antagonists/antagonists/filename.ts. This file name MUST be theantag_flagof your ruleset, with nothing but letters remaining (e.g. "Nuclear Operative" ->nuclearoperative). - Add it to
special_roles.
Creating icons
If you are satisfied with your icon just being a dude with some clothes, then you can specify preview_outfit in your /datum/antagonist.
Space Ninja, for example, looks like:
/datum/antagonist/ninja
	preview_outift = /datum/outfit/ninja
However, if you want to get creative, you can override /get_preview_icon(). This proc should return an icon of size ANTAGONIST_PREVIEW_ICON_SIZExANTAGONIST_PREVIEW_ICON_SIZE.
There are some helper procs you can use as well. render_preview_outfit(outfit_type) will take an outfit and give you an icon of someone wearing those clothes. finish_preview_outfit will, given an icon, resize it appropriately and zoom in on the head. Note that this will look bad on anything that isn't a human, so if you have a non-human antagonist (such as sentient disease), just run icon.Scale(ANTAGONIST_PREVIEW_ICON_SIZE, ANTAGONIST_PREVIEW_ICON_SIZE).
For inspiration, here is changeling's:
/datum/antagonist/changeling/get_preview_icon()
	var/icon/final_icon = render_preview_outfit(/datum/outfit/changeling)
	var/icon/split_icon = render_preview_outfit(/datum/outfit/job/engineer)

	final_icon.Shift(WEST, world.icon_size / 2)
	final_icon.Shift(EAST, world.icon_size / 2)

	split_icon.Shift(EAST, world.icon_size / 2)
	split_icon.Shift(WEST, world.icon_size / 2)

	final_icon.Blend(split_icon, ICON_OVERLAY)

	return finish_preview_icon(final_icon)
...which creates:

Creating the tgui representation
In the .ts file you created earlier, you must now give the information of your antagonist. For reference, this is the changeling's:
import { Antagonist, Category } from "../base";
import { multiline } from "common/string";

const Changeling: Antagonist = {
  key: "changeling", // This must be the same as your filename
  name: "Changeling",
  description: [
    multiline`
      A highly intelligent alien predator that is capable of altering their
      shape to flawlessly resemble a human.
    `,

    multiline`
      Transform yourself or others into different identities, and buy from an
      arsenal of biological weaponry with the DNA you collect.
    `,
  ],
  category: Category.Roundstart, // Category.Roundstart, Category.Midround, or Category.Latejoin
};

export default Changeling;
Readying the Dynamic ruleset
You already need to create a Dynamic ruleset, so in order to get your antagonist recognized, you just need to specify antag_flag. This must be unique per ruleset.
Two other values to note are antag_flag_override and antag_preference.
antag_flag_override exists for cases where you want the banned antagonist to be separate from antag_flag. As an example: roundstart, midround, and latejoin traitors have separate antag_flag, but all have antag_flag_override = ROLE_TRAITOR. This is because admins want to ban a player from Traitor altogether, not specific rulesets.
If antag_preference is set, it will refer to that preference instead of antag_flag. This is used for clown operatives, which we want to be on the same preference as standard nuke ops, but must specify a unique antag_flag for.
Updating special_roles
In code/__DEFINES/role_preferences.dm (the same place you'll need to make your ROLE_* defined), simply add your antagonist to the special_roles assoc list. The key is your ROLE, the value is the number of days since your first game in order to play as that antagonist.