 MrMelbert
8a44bf25fc
MrMelbert
8a44bf25fc
Fixes #89445 (well, technically. It fixes the bug associated but these `say`s should really be emotes.) Three things: 1. Reworks how language translation works. Rather than scrambling a sentence into a language entirely, sentences are now scrambled on a per-word basis. Additionally, the 1000 most common words of a language are *never* re-scrambled across the duration of a round. Once it's set it's set in stone. Example: (Sample / Old / New)  This allows for a number of things: - More consistent translations, making it (more) viable to actually "teach" someone words for something - Maintaining emphasis such as caps (but not `||`, `++`, or `__` - at least not yet) - The following: 2. Adds partial language understanding Some languages can understand portions of other languages.  This pr adds the following: - Those who understand Beachtongue can understand 50% of Common and 33% of Uncommon words. - Those who understand Common can understand 33% of Beachtongue and 20% of Uncommon words. - Those who understand Uncommon can understand 20% of Common and 20% of Beachtongue words. 3. Bilingual quirk has been expanded to accomodate these changes. There are now two more preferences: - Language Speakable - You can toggle this, so you only understand the language, rather than understand AND speak. - Language Skill - If you choose to be unable to speak the language, you can set how much of the language you can understand, down to 10%. Playing around languages is fun, but due to the way our translation works, ALL context is immediately lost for what the other person may be saying. If the other person is shouting in all caps? Output language is normal chatting. This is lame! Even if someone is unable to understand you, there's a LOT you can convey just by how you speak, and getting that across in game is quite difficult when all translations get mauled so badly. So this changes that. - Emphasis like caps lock is maintained, so you see someone shouting in caps in a foreign language you can probably intuit something is wrong (but not what is wrong!) - Some languages can gleam bits of other languages, so you MIGHT be able to pick out context if you pay close attention - "Brother" languages will now feel more like "brothers" and not completely divergent - You can even "teach" someone words in your language - at least the most common words! (Until next round) 🆑 Melbert add: Languages can now have partial understanding of other languages. More common English words are more likely to be mutually understood. add: Those who understand Beachtongue can understand 50% of Common and 33% of Uncommon words. add: Those who understand Common can understand 33% of Beachtongue and 20% of Uncommon words. add: Those who understand Uncommon can understand 20% of Common and 20% of Beachtongue words. add: Bilingual quirk: You can now choose between being able to speak or not speak the language add: Bilingual quirk: You can now choose to have partial understanding of your language, rather than full. qol: If you speak in ALL CAPS in a foreign language, the translated words will also be ALL CAPS. qol: Many more forms of punctuation are now conveyed across translations. qol: The 1000 most common English words will now never be scrambled when translating into other languages for the duration of the round. This means you can actually "learn" some words if you are especially attentive! (Until the next round at least) refactor: Refactored language translations. Report if you see any super odd looking translations. fix: Force-says forcing you to speak common (such as cult invocations) will now correctly force you to speak common (even if you don't know common) /🆑
Preferences (by Mothblocks)
This does not contain all the information on specific values--you can find those as doc-comments in relevant paths, such as /datum/preference. Rather, this gives you an overview for creating most preferences, and getting your foot in the door to create more advanced ones.
Anatomy of a preference (A.K.A. how do I make one?)
Most preferences consist of two parts:
- A
/datum/preferencetype. - A tgui representation in a TypeScript file.
Every /datum/preference requires these three values be set:
category- See Categories.savefile_key- The value which will be saved in the savefile. This will also be the identifier for tgui.savefile_identifier- Whether or not this is a character specific preference (PREFERENCE_CHARACTER) or one that affects the player (PREFERENCE_PLAYER). As an example: hair color isPREFERENCE_CHARACTERwhile your UI settings arePREFERENCE_PLAYER, since they do not change between characters.
For the tgui representation, most preferences will create a .tsx file in tgui/packages/tgui/interfaces/PreferencesMenu/preferences/features/. If your preference is a character preference, make a new file in character_preferences. Otherwise, put it in game_preferences. The filename does not matter, and this file can hold multiple relevant preferences if you would like.
From here, you will want to write code resembling:
import { Feature } from "../base";

export const savefile_key_here: Feature<T> = {
  name: "Preference Name Here",
  component: Component,

  // Necessary for game preferences, unused for others
  category: "CATEGORY",

  // Optional, shown as a tooltip
  description: "This preference will blow your mind!",
}
T and Component depend on the type of preference you're making. Here are all common examples...
Numeric preferences
Examples include age and FPS.
A numeric preference derives from /datum/preference/numeric.
/datum/preference/numeric/legs
	category = PREFERENCE_CATEGORY_NON_CONTEXTUAL
	savefile_identifier = PREFERENCE_CHARACTER
	savefile_key = "legs"

	minimum = 1
	maximum = 8
You can optionally provide a step field. This value is 1 by default, meaning only integers are accepted.
Your .tsx file would look like:
import { Feature, FeatureNumberInput } from "../base";

export const legs: Feature<number> = {
  name: "Legs",
  component: FeatureNumberInput,
}
Toggle preferences
Examples include enabling tooltips.
/datum/preference/toggle/enable_breathing
	category = PREFERENCE_CATEGORY_NON_CONTEXTUAL
	savefile_identifier = PREFERENCE_CHARACTER
	savefile_key = "enable_breathing"

	// Optional, TRUE by default
	default_value = FALSE
Your .tsx file would look like:
import { CheckboxInput, FeatureToggle } from "../base";

export const enable_breathing: FeatureToggle = {
  name: "Enable breathing",
  component: CheckboxInput,
}
Choiced preferences
A choiced preference is one where the only options are in a distinct few amount of choices. Examples include skin tone, shirt, and UI style.
To create one, derive from /datum/preference/choiced.
/datum/preference/choiced/favorite_drink
	category = PREFERENCE_CATEGORY_NON_CONTEXTUAL
	savefile_identifier = PREFERENCE_CHARACTER
	savefile_key = "favorite_drink"
Now we need to tell the game what the choices are. We do this by overriding init_possible_values(). This will return a list of possible options.
/datum/preference/choiced/favorite_drink/init_possible_values()
	return list(
		"Milk",
		"Cola",
		"Water",
	)
Your .tsx file would then look like:
import { FeatureChoiced, FeatureDropdownInput } from "../base";

export const favorite_drink: FeatureChoiced = {
  name: "Favorite drink",
  component: FeatureDropdownInput,
};
This will create a dropdown input for your preference.
Choiced preferences - Icons
Choiced preferences can generate icons. This is how the clothing/species preferences work, for instance. However, if we just want a basic dropdown input with icons, it would look like this:
/datum/preference/choiced/favorite_drink
	category = PREFERENCE_CATEGORY_NON_CONTEXTUAL
	savefile_identifier = PREFERENCE_CHARACTER
	savefile_key = "favorite_drink"
	should_generate_icons = TRUE // NEW! This is necessary.

/datum/preference/choiced/favorite_drink/init_possible_values()
	return list("Milk", "Cola", "Water")

// New! This proc will get called for every value.
/datum/preference/choiced/favorite_drink/icon_for(value)
	switch (value)
		if ("Milk")
			return uni_icon('drinks.dmi', "milk")
		if ("Cola")
			return uni_icon('drinks.dmi', "cola")
		if ("Water")
			return uni_icon('drinks.dmi', "water")
Then, change your .tsx file to look like:
import { FeatureChoiced, FeatureIconnedDropdownInput } from "../base";

export const favorite_drink: FeatureChoiced = {
  name: "Favorite drink",
  component: FeatureIconnedDropdownInput,
};
Choiced preferences - Display names
Sometimes the values you want to save in code aren't the same as the ones you want to display. You can specify display names to change this.
The only thing you will add is "compiled data".
/datum/preference/choiced/favorite_drink/compile_constant_data()
	var/list/data = ..()

	// An assoc list of values to display names
	data[CHOICED_PREFERENCE_DISPLAY_NAMES] = list(
		"Milk" = "Delicious Milk",
		"Cola" = "Crisp Cola",
		"Water" = "Plain Ol' Water",
	)

	return data
Your .tsx file does not change. The UI will figure it out for you!
Color preferences
These refer to colors, such as your OOC color. When read, these values will be given as 6 hex digits, without the pound sign.
/datum/preference/color/eyeliner_color
	category = PREFERENCE_CATEGORY_NON_CONTEXTUAL
	savefile_identifier = PREFERENCE_CHARACTER
	savefile_key = "eyeliner_color"
Your .tsx file would look like:
import { FeatureColorInput, Feature } from "../base";

export const eyeliner_color: Feature<string> = {
  name: "Eyeliner color",
  component: FeatureColorInput,
};
Name preferences
These refer to an alternative name. Examples include AI names and backup human names.
These exist in code/modules/client/preferences/names.dm.
These do not need a .ts file, and will be created in the UI automatically.
/datum/preference/name/doctor
	savefile_key = "doctor_name"

	// The name on the UI
	explanation = "Doctor name"

	// This groups together with anything else with the same group
	group = "medicine"

	// Optional, if specified the UI will show this name actively
	// when the player is a medical doctor.
	relevant_job = /datum/job/medical_doctor
Making your preference do stuff
There are a handful of procs preferences can use to act on their own:
/// Apply this preference onto the given client.
/// Called when the savefile_identifier == PREFERENCE_PLAYER.
/datum/preference/proc/apply_to_client(client/client, value)

/// Fired when the preference is updated.
/// Calls apply_to_client by default, but can be overridden.
/datum/preference/proc/apply_to_client_updated(client/client, value)

/// Apply this preference onto the given human.
/// Must be overriden by subtypes.
/// Called when the savefile_identifier == PREFERENCE_CHARACTER.
/datum/preference/proc/apply_to_human(mob/living/carbon/human/target, value)
For example, /datum/preference/numeric/age contains:
/datum/preference/numeric/age/apply_to_human(mob/living/carbon/human/target, value)
	target.age = value
If your preference is PREFERENCE_CHARACTER, it MUST override apply_to_human, even if just to immediately return.
You can also read preferences directly with prefs.read_preference(/datum/preference/type/here), which will return the stored value.
Categories
Every preference needs to be in a category. These can be found in code/__DEFINES/preferences.dm.
/// These will be shown in the character sidebar, but at the bottom.
#define PREFERENCE_CATEGORY_FEATURES "features"

/// Any preferences that will show to the sides of the character in the setup menu.
#define PREFERENCE_CATEGORY_CLOTHING "clothing"

/// Preferences that will be put into the 3rd list, and are not contextual.
#define PREFERENCE_CATEGORY_NON_CONTEXTUAL "non_contextual"

/// Will be put under the game preferences window.
#define PREFERENCE_CATEGORY_GAME_PREFERENCES "game_preferences"

/// These will show in the list to the right of the character preview.
#define PREFERENCE_CATEGORY_SECONDARY_FEATURES "secondary_features"

/// These are preferences that are supplementary for main features,
/// such as hair color being affixed to hair.
#define PREFERENCE_CATEGORY_SUPPLEMENTAL_FEATURES "supplemental_features"
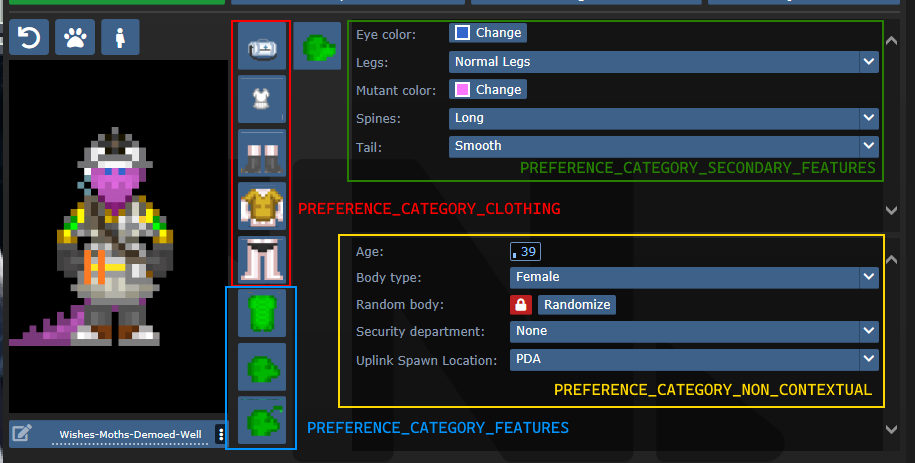
SECONDARY_FEATURES or NON_CONTEXTUAL?
Secondary features tend to be species specific. Non contextual features shouldn't change much from character to character.
Default values and randomization
There are three procs to be aware of in regards to this topic:
create_default_value(). This is used when a value deserializes improperly or when a new character is created.create_informed_default_value(datum/preferences/preferences)- Used for more complicated default values, like how names require the gender. Will callcreate_default_value()by default.create_random_value(datum/preferences/preferences)- Explicitly used for random values, such as when a character is being randomized.
create_default_value() in most preferences will create a random value. If this is a problem (like how default characters should always be human), you can override create_default_value(). By default (without overriding create_random_value), random values are just default values.
Advanced - Server data
As previewed in the display names implementation, there exists a compile_constant_data() proc you can override.
Compiled data is used wherever the server needs to give the client some value it can't figure out on its own. Skin tones use this to tell the client what colors they represent, for example.
Compiled data is sent to the serverData field in the FeatureValueProps.
Advanced - Creating your own tgui component
If you have good knowledge with tgui (especially TypeScript), you'll be able to create your own component to represent preferences.
The component field in a feature accepts any component that accepts FeatureValueProps<TReceiving, TSending = TReceiving, TServerData = undefined>.
This will give you the fields:
act: typeof sendAct,
featureId: string,
handleSetValue: (newValue: TSending) => void,
serverData: TServerData | undefined,
shrink?: boolean,
value: TReceiving,
act is the same as the one you get from useBackend.
featureId is the savefile_key of the feature.
handleSetValue is a function that, when called, will tell the server the new value, as well as changing the value immediately locally.
serverData is the server data, if it has been fetched yet (and exists).
shrink is whether or not the UI should appear smaller. This is only used for supplementary features.
value is the current value, could be predicted (meaning that the value was changed locally, but has not yet reached the server).
For a basic example of how this can look, observe CheckboxInput:
export const CheckboxInput = (
  props: FeatureValueProps<BooleanLike, boolean>
) => {
  return (<Button.Checkbox
    checked={!!props.value}
    onClick={() => {
      props.handleSetValue(!props.value);
    }}
  />);
};
Advanced - Middleware
A /datum/preference_middleware is a way to inject your own data at specific points, as well as hijack actions.
Middleware can hijack actions by specifying action_delegations:
/datum/preference_middleware/congratulations
	action_delegations = list(
		"congratulate_me" = PROC_REF(congratulate_me),
	)

/datum/preference_middleware/congratulations/proc/congratulate_me(list/params, mob/user)
	to_chat(user, span_notice("Wow, you did a great job learning about middleware!"))

	return TRUE
Middleware can inject its own data at several points, such as providing new UI assets, compiled data (used by middleware such as quirks to tell the client what quirks exist), etc. Look at code/modules/client/preferences/middleware/_middleware.dm for full information.
Antagonists
In order to make an antagonist selectable, you must do a few things:
- Your antagonist needs an icon.
- Your antagonist must be in a Dynamic ruleset. The ruleset must specify the antagonist as its
antag_flag. - Your antagonist needs a file in
tgui/packages/tgui/interfaces/PreferencesMenu/antagonists/antagonists/filename.ts. This file name MUST be theantag_flagof your ruleset, with nothing but letters remaining (e.g. "Nuclear Operative" ->nuclearoperative). - Add it to
special_roles.
Creating icons
If you are satisfied with your icon just being a dude with some clothes, then you can specify preview_outfit in your /datum/antagonist.
Space Ninja, for example, looks like:
/datum/antagonist/ninja
	preview_outift = /datum/outfit/ninja
However, if you want to get creative, you can override /get_preview_icon(). This proc should return an icon of size ANTAGONIST_PREVIEW_ICON_SIZExANTAGONIST_PREVIEW_ICON_SIZE.
There are some helper procs you can use as well. render_preview_outfit(outfit_type) will take an outfit and give you an icon of someone wearing those clothes. finish_preview_outfit will, given an icon, resize it appropriately and zoom in on the head. Note that this will look bad on anything that isn't a human, so if you have a non-human antagonist (such as sentient disease), just run icon.Scale(ANTAGONIST_PREVIEW_ICON_SIZE, ANTAGONIST_PREVIEW_ICON_SIZE).
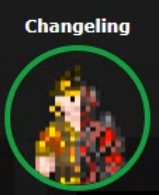
For inspiration, here is changeling's:
/datum/antagonist/changeling/get_preview_icon()
	var/icon/final_icon = render_preview_outfit(/datum/outfit/changeling)
	var/icon/split_icon = render_preview_outfit(/datum/outfit/job/engineer)

	final_icon.Shift(WEST, ICON_SIZE_X / 2)
	final_icon.Shift(EAST, ICON_SIZE_X / 2)

	split_icon.Shift(EAST, ICON_SIZE_X / 2)
	split_icon.Shift(WEST, ICON_SIZE_X / 2)

	final_icon.Blend(split_icon, ICON_OVERLAY)

	return finish_preview_icon(final_icon)
...which creates:
Creating the tgui representation
In the .ts file you created earlier, you must now give the information of your antagonist. For reference, this is the changeling's:
import { Antagonist, Category } from "../base";
import { multiline } from "tgui-core/string";

const Changeling: Antagonist = {
  key: "changeling", // This must be the same as your filename
  name: "Changeling",
  description: [
    multiline`
      A highly intelligent alien predator that is capable of altering their
      shape to flawlessly resemble a human.
    `,

    multiline`
      Transform yourself or others into different identities, and buy from an
      arsenal of biological weaponry with the DNA you collect.
    `,
  ],
  category: Category.Roundstart, // Category.Roundstart, Category.Midround, or Category.Latejoin
};

export default Changeling;
Readying the Dynamic ruleset
You already need to create a Dynamic ruleset, so in order to get your antagonist recognized, you just need to specify antag_flag. This must be unique per ruleset.
Two other values to note are antag_flag_override and antag_preference.
antag_flag_override exists for cases where you want the banned antagonist to be separate from antag_flag. As an example: roundstart, midround, and latejoin traitors have separate antag_flag, but all have antag_flag_override = ROLE_TRAITOR. This is because admins want to ban a player from Traitor altogether, not specific rulesets.
If antag_preference is set, it will refer to that preference instead of antag_flag. This is used for clown operatives, which we want to be on the same preference as standard nuke ops, but must specify a unique antag_flag for.
Updating special_roles
In code/__DEFINES/role_preferences.dm (the same place you'll need to make your ROLE_* defined), simply add your antagonist to the special_roles assoc list. The key is your ROLE, the value is the number of days since your first game in order to play as that antagonist.